Présenté par Blogger.

SugarPea Designs: Book Club!

 TGIF, everyone!

I'm here again for SugarPea Designs and our last sneak peek of the week before all sets become available in store later today!

Today's featured products are probably my favorite, just because... books! I'm talking about the Basic Bookmark SugarCut, the SugarCut Book Words and the Book Club stamp set.

Here's my card featuring all three new sets!


I've been diving head first into the Slim Line trend and thought it would fit nicely the size of the book mark die.


I spent a lot of time putting this project together; not because it was hard, but truly because I wanted to get the 'right' look with all the detailed elements. I loooooove the realistic effect of the stacked books and the shelf!


Now, you really don't want to miss the inspiration on the SugarPea Designs blog and the official launch in store later today. Stay tuned for more!


SugarPea Designs: Coffee Cuties!

 Good morning, all!

Another day, another sneak peek with the Fall release at SugarPea Designs!

Today's sneak peek features the Coffee Cuties SugarCutWhole Latte WordsCool Beans Stencil and Brew-tiful Sentiments


I had SO MUCH FUN assembling this to-go cup, you have no idea! All the pieces are the perfect size and very easy to manipulate. They add a little whimsical touch to the project for sure!


With pumpkin latte season in full swing, I couldn't not choose the Latte Word die, of course!

Make sure to look up more inspiration on the SugarPea Designs blog and have your cart ready for Friday when all the new sets hit the store!


SugarPea Designs: Little Village!

 Happy Tuesday!

It's Day 2 of the new release sneak peek at SugarPea Designs and I'm thrilled to share more inspiration with you all!


I was so inspired by this set that I created a Slim Line project with all the little elements!


I also added the Picket Fence SugarCut for more of a 'townie' feel to the project.


Remember, this set will be available in store this Friday and not before!

Find more inspiration and details on the giveaway on the SugarPea Designs blog!

SugarPea Designs: Always welcome!

 Hey everyone!

I've had a blast this weekend creating with the brand new release from SugarPea Designs and can't wait to share it all with you!


Today's highlight is all about the new 'Always Welcome' stamp and die sets (link available in store this Friday).


And here is my card! I decided to give it a little Christmas twist, because I'm definitely in the mood for the Holidays even though it's only September.


This set is so versatile, as it has elements for Halloween, Fall, Thanksgiving, Spring, and all-year round.
 I paired it with the Honeycomb Cover Plate die, one of my favorite cover plates!


For more inspiration and a giveaway, make sure to start hopping from the SugarPea Designs blog!

I'll be back tomorrow with another fun sneak peek!

LDRS Creative: Let's Paw-ty!


Hey everyone!

I'm back with you today for LDRS Creative using the latest Halloween collection in store! You might not have noticed it yet if you have been living under a rock, but Fall is coming rather sooner than later, so it's definitely accepted in craft society to start working on Halloween projects! And what better than to use brand new stamps to spark creativity! I mean, I can't resist seasonal projects, they have such a special feel to them, like... time passes!


I first stamped all my images from the new Trick or Treat stamp set with Raven hybrid ink, colored them with alcohol markers and then proceeded to diecut with the coordinating die set.


I had in mind to create a slim line project with the new Trick or Treat paper pack because the patterns were really calling out to me. So I created a card base with a piece of 6 1/2"x8 1/4" and scored it in two at 3 1/4". Next, I cut a piece of of the purple ghost sheet and covered the entire card front. To frame things, I cut out the Pretty Patterns Slim Line die set with black cardstock and by securing both larger dies, it created a frame that I could place on top of the card front with little squares of foam tape, for more dimension.


When I was playing around with all the images, I had the idea of creating a "road" to the haunted mansion for my characters, so I sketched a shadowy road out of the bat patterned sheet from the same Trick or Treat paper pack and outlined it with white cardstock.


I also made sure to vary the number of little foam squares behind all the puppies to make sure nothing would look to "flat".


I completed the project with a sentiment also from the Trick or Treat stamp set stamped with Raven hybrid ink on a piece of white cardstock that I trimmed into a skinny white rectangle. And that was it!


I can't begin to tell you how much fun I had creating this project! There's never a wrong time to play with 

Halloween sets, honestly.


Have a great day, all!

SugarPea Designs: Create Your Own Sunshine

 Hey everyone! Stephanie here with you today for SugarPea Designs with my last Summer project in the books! I mean... School is starting next week for me (I'm an ESL teacher in Quebec, Canada) and I'm definitely ready for cooler weather and cozy sweaters!


So to celebrate the last bit of sunshine, I used the new Waves Of Love , Sunshine Sentiments and SugarCut-Sunshine Word (see what I did here?! LOL).


First, I wanted to create a pier scene and started stamping the different elements from the Waves Of Love set onto a piece of coloring cardstock.

Next, I colored everything with my alcohol markers, roughly drawing a pier on the right side of the panel, to support the bucket of fish flying into the ocean.

After that, I ran the panel into my diecutting machine with the largest stitched rectangle from the SugarCut-Card Front Element Builder III set and adhered it to my A2 cardbase, before adding a sentiment from the Sunshine Sentiments embossed in white and three layers of the SugarCut-Sunshine Word, that one being mounted with foam tape for more dimension!

It definitely feels good to say goodbye to Summer in style, don't you think? ;-)


LDRS Creative: Friends make happiness bloom!


Hey everyone!

Stephanie with you today for LDRS Creative with a fun, quick, and EASY project featuring the Summer collection once again!

I used the Folk Art A2 Cover Plate Die to highlight the wonderful patterns of the Painted Garden paperpack.  Believe me, this card took no time at all to make!

First, I created a regular A2 cardbase, which I covered with a sheet of patterned paper from the 

Painted Garden paperpack. No need for dimension, because that's actually the next step!


Next, I diecut twice the Folk Art A2 Cover Plate Die; once in red-ish cardstock, then another time in baby blue cardstock. After that, I sprayed the baby blue panel with liquid adhesive and glued it on top of the red panel, but slightly off-setting it so that we'd see it through.


Once that was done, I added tiny bits of foam tape everywhere I could behind the diecut panel to give more dimension when it would adhere the pattern paper. 


Finally, I added a sentiment from the Corner Garden set embossed in white on a piece of navy cardstock with foam tape right in the center. And that was it!

I hope you like it and will try it with all the Folk Art goodness in store!

LDRS Creative: Tutorial One-Layer Garden's Edge Flowers: Hello!


Hey everyone!

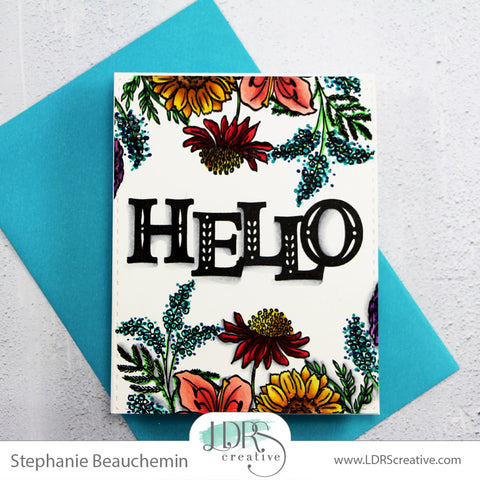
Stephanie here with you today for LDRS Creative to share how I create a garden-inspired scene using the latest Summer collection!


I've been in a strange place over the last few months, not sure whether I wanted to pick up my markers or read a good book. But once I received the 

Summer collection and especially the new Garden's Edge Slimline stamp set, I couldn't resist jumping back on the wagon.


Before even getting to the coloring part, I had in mind to create a one-layer project that included both the images and the sentiment. To achieve this, I took out my Chloe Alpha Uppercase stamp set and started placing the different letters on my stamping platform on a piece of A2 white coloring cardstock. 


TIP: I find it easier to start by stamping the first and last letter to see how much space I have for the other letters. Of course, I used the Raven hybrid ink and the Stampendable tool to get a crisp, dark stamping every time!


Next, I stamped the second and second-to-last letters quite close to the first stamped ones, ending with the middle one, to create the word "Hello".


Once the sentiment was done, I placed the flower border from the 

Garden's Edge Slimline stamp set on my stamping platform in a way that featured only partially the flowers I wanted to color at the bottom of the panel.


And I mirrored the flower border at the top of the panel as well. 


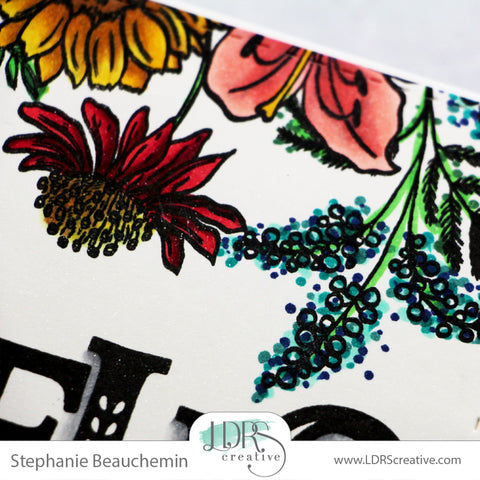
Once that was done, all I had to do was to start coloring all the beautiful flowers with my alcohol markers.

I used the same color top and bottom, but you could totally adapt to whatever combo you prefer!
TIP: One-layer projects tend to be "flat", so you can add dimension with markers by shading each element just a little bit here and there. Try it!
To finish off nicely, I ran the colored panel in my diecutting machine with the largest rectangle from the A2 Stitched Layered Card Toppers die set, then adhered the stitched panel to an A2 white cardbase.
I hope you like this kind of one-layer projects and will be back with another project very, very soon!
xox

LDRS Creative: Impatiens all over the place!


Hey everyone!


I'm back here for LDRS Creative and I'm so excited to share one of my tricks with you, using a background stamp set!


When I first saw the Impatiens 6x6 stamp set, I have to admit I fell in love (sorry, hubby!). There are so many possibilities with this set! For today's card, I went simple, though.


I first stamped the set with Peachy Keen hybrid ink to get a no-line coloring effect when using alcohol markers. 

TIP: I found it easier to color in the dark areas for the backdrop first, and then to move on to the leaves, finishing with the actual flowers.


Once that was done, I cut the colored panel to fit an A2 cardbase (which I now would redo with the A2 Stitched Layered Cover Card Toppers die set) and without adding any dimension tape, it gave me a flat, one-layered card. Well, almost.


I did add foam behind the three little sentiment done with Raven hybrid ink and the Get Well stamp set, along with the Sentiment Stack die.


I hope you like it and will try the 

Impatiens 6x6 stamp set, too! You could divide the full background to create more cards out of one coloring session, emboss it in gold over dark cardstock, etc. Still plenty of ideas to go around!


Until next time, xxx
SugarPea Designs: Sweet Peek Hey Spring!

 Hello, all!

Wow, already Day Four with the Sweet Peek release at SugarPea Designs!

Today is all about the fabulous bear series and the new set called Hey Spring and its coordinating SugarCut. I loved pairing it with the SugarCut-Cover Plate Spring Scene Builder and the SugarCut-Picket Fence to create an A2 card that says "Let's Always Bee Friends".


I first started by stamping all the characters from the set and colored them with Copic markers. Once that was done, I diecut the whole thing with the coordinating set. Next, I diecut the Spring Scene Builder with solid cardstock and started playing with the different layers.

Foam tape was truly the key here!


I also forgot my sentiment but thankfully, the card fitted perfectly in my Mini Misti stamping platform.

And that was it, friend! Hope you like it :)


SugarPea Designs: Sweet Peek Take Me To Your Cake!

 Good morning!

Today is Day 3 of the new release at SugarPea Designs and I'm thrilled to share another project!

I used the Take Me To Your Cake stamp set and its coordinating SugarCut to create a cosmic card.


First, I started with Oxide inks and ink blended a panel that would set the tone for the card. To create the stars, I added some Frantage embossing powder by Stampendous and heat set under the project, or it would scatter everywhere. While that was drying, I stamped all the cutie aliens from the Take Me To Your Cake stamp set and colored them with Copic markers.

I used the SugarCut-Stitched Rectangles to diecut my background and then added all the bits and pieces with foam tape, for more dimension.


I finished the card with a sentiment embossed in white on black cardstock and that was it! Hope you like it as much as I do!


LDRS Creative: Creating the most beautiful flowerbed!


Hey, all!

I'm back for a second time today with you for LDRS Creative and I'm so excited to share this project of mine I like to call flowerbeds for springtime, using the latest products in store and some masking paper!

That's right, flowerbeds. I am obsessed with them at this time of the year, because you can clearly see life appearing with the little blooms here and there. So of course, I had to play with the flower sets that were just released in February and April: the Pelagornium, Snapdragon, Magnolia and Lily stamp sets.

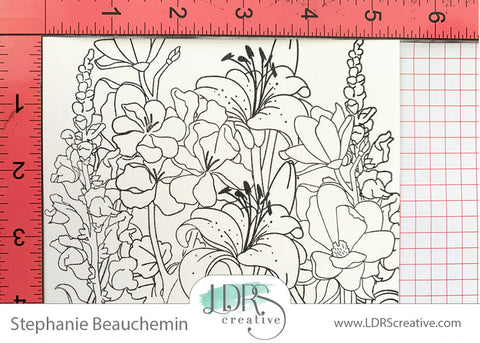
But to get all these flowers on the same card, I had to do a little bit (okay, a LOT) of masking. Here's how I did it.

TUTORIAL

First, I played with the different stamps on my A2 panel to see where they would fit best and what I would like to have at the forefront.

Next, I stamped the two flowers I had selected with Raven hybrid ink and created a mask to go on top of them.

After that, I slowly stamped my way through with more flowers, masking, stamping, until I was satisfied.

This is the final look without all the masks, before coloring in with alcohol markers. 

TIP: Coloring the background first helps a lot with distinguishing what goes where!

When the coloring part was done, all I had to do was to adhere the panel to an A2 cardbase, trim any excess that would show at the edge.

I completed the project with a sentiment from the Get Well 4x4 Sentiment Stack and the coordinating Sentiment Stack banner die set

And that is it! Final look!

I hope this brings some joy to you today and I cannot wait to share more in the upcoming days!

SugarPea Designs: Sweet Peek Spring release!

 Hello everyone!

I'm stopping by on my blog today to share this adorable card made with the latest release at SugarPea Designs!

I couldn't resist playing with solid cardstock (a great change from my usual colored images, wouldn't you say?) with the new Paint Palette and Splash of Color sets.


It was a great way to use the huuuuge leftover pile of cardstock that I simply can't throw away. I combined it with the SugarCut-Chevron Cover Plate for a nice backdrop.


I can't wait to show you more of the new release this week!


LDRS Creative on HSN: New exclusive sets available now!

 Me again today! BEWARE, heavy picture-filled post!


I just wanted to make sure you all knew about the new exclusive sets coming to HSN by LDRS Creative!


We have the new Fruit and Veggie stamp and coordinating die set.


And a Pirouette stamp set that will only be available on AUTOSHIP this TUESDAY! Be quick, as I know many of us missed the last autoship on the Pocket Pals and still regret it to this day.


Make sure you don't miss them on the HSN by LDRS Creative page!