Présenté par Blogger.
Aucun message portant le libellé mixed media. Afficher tous les messages

LDRS Creative : Mixed media cover tutorial

Hello there!
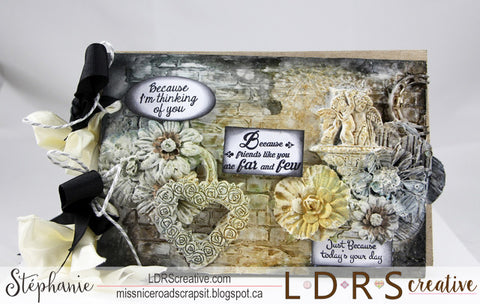
I'm back to share a mixed media album I've been working on with LDRS Creative for my cruise project last May! At first, I really wanted to challenge myself with a sentiment-only project, and then it became something else completely when I tried it in a mixed media way. I'll try to walk you through the steps of making the cover of the mini-album, where you can see a few sentiments from the Just Because set. I selected them because it will be filled with memories from my friend and I when completed.
SO, the first step is to cut all your chipboard sheets to 7"x5" or whatever size you'd like, the number of sheets depending on your purpose for this album. I thought this one would fit perfectly with pictures to commemorate a longtime friendship! After that, punch two holes on the left side. Then, with a stencil and a knife, add some modeling paste to create the background. 
Don't hesitate to scrap down a few spots, to remove the "perfectly well-done" look ;-) This is mixed media!
Next, glue a few embellishments from your stash. Don't mind the colour and don't hesitate in cropping them with your scissors. I even used a plastic wheel from my adhesive gun, eheh! Remember that heavy objets will need stronger adhesive.
Cover everything with gesso and let dry.
When everything is completely dried, mist away with spray colours!
While drying once again, stamp your sentiments on white cardstock. Then, take out some black ink with a sponge dauber and ink the edges.
You can also ink the edges of your chipboard panel when completely dried.
Last step is to bind all panels with some ribbons...
...and to tie a big bow!
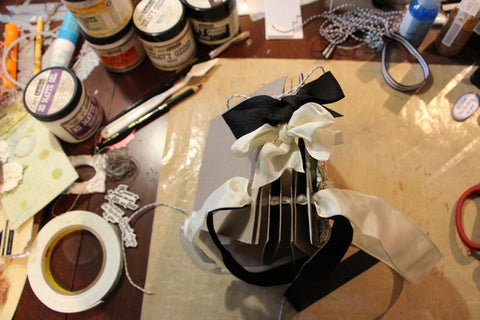
 And the final result! Now all you need is to complete the other pages and give it to a loved one :-)


LDRS Creative Teams Up With Faber Castell: A full scrapbooking page tutorial!

Welcome to Day 3 of LDRS Creative and Faber-Castell week long blog Hop!  What an exciting combining of Companies we have for you this week.  There will be so much inspiration on the LDRS Blog and Faber-Castell's Blog!  And of course prizes!
At the end of the week LDRS will be choosing one lucky winner to receive a $50 gift voucher to the LDRS store.  Faber-Castelo also has a $50 Prize Pack.  So be sure to leave a comment for your chance to win!!!!
And I also have two projects for you!

I was thrilled when receiving the amazing products from Faber-Castell and try to do my best to showcase them. 

I started with a 12"x12" white mixed media cardstock to make sure all the water wouldn't flood it. I put some white gesso with a spatula on the areas where I was going to use my Gelatos, then let it dry completely. 

Then, I put some Gold Champagne Gelato on a piece of wax paper, sprayed a good amount of water, scrub it all together and applied it on the gesso-ed areas on my paper. Since there's a lot of water, you can incline the background to create drips as much as you like. I let it dry, and repeat the same steps with the Iced Chai Gelato

Once everything is dried, I stenciled numbers with my red Big Brush  Pitt Pen and one of the stencils from the 102 Stencil Collection. I scribbled with a black Pitt Pen over them. After that, all I had to do was to tear up some scrap paper, lay it on the page, place my Wings image (coloured with Copic markers and outlined with a black Pitt Pen), add some Gilded Doily die-cuts here and there, and stamp a sentiment from the Just Because set with a black Pitt Pen onto a Gilded Oval label. Easy peasy!


Be sure to be back on Friday for my second project!


Bloom Girls - Happy endings are only new beginnings

Good morning everyone!

I'm thrilled to show you this creation today, as it made me go way out of my comfort zone, and I loved the experience! I have been turning this concept of card in my head for quite a while now, and then, it hit me: watercolours, alcohol markers, and an epic sentiment to focus on. Not to mention a gorgeous floral stamp!

Here's what you need to create this card:

Colouring medium and ink (I used Copic markers and Memento Tuxedo Black ink)
Bloom cling stamp - Floral
Bloom cling stamp - Sentiment from Lacie's set
Distress inks or your favourite watercolouring products
Mop brush
Water
Scott towels or any sponging paper
Mixed media paper
Foam tab adhesives
Kraft and black cardstock


  1. Start by cutting a 4"x6" piece of mixed media cardstock.
  2. With your brush, add water on your cardstock, carefully trying not to go too far near the edges.
  3. Again with using your wet brush, dab some ink and transfer onto the watered surface of your cardstock. You should see the water reacting immediately.
  4. Add more ink of the same colour for intensity, or change colours and repeat the step onto other parts of your cardstock.
  5. Gently sprinkle water with your brush over the full piece, and sponge with your scott towel. Let everything dry completely.This will create "blank" spots, increasing the watercolour effect.
  6. Stamp your flower onto regular colouring cardstock and colour it.
  7. Stamp sentiment onto cardstock, separate and cut words.
  8. Once your mixed media piece is dry enough, glue to a 4-3/16"x6-3/16" of black cardstock, mounting both on 4-3/8"x6-3/8" cardbase of kraft cardstock.
  9. Put foam tab adhesives behind your flower image and some sentiment pieces, mount onto mixed media cardstock. Put regular adhesive on the pieces that are left.


The process of this card was pretty easy, so you should be able to overflow our facebook group with your inspiration, too! 

Bloom Girl stamps : October challenge!

(english version follows)


Bonnnnnnnjour!

Oh làlà, vous allez avoir du plaisir ce mois-ci, en tk autant que moi j'en ai eu à sortir de ma zone de confort, ça c'est certain! L'halloween arrive plus vite qu'on le pense!

Gooooooooood day everyone!

Oooooh, it's time for a new Bloom Girls inspiration challenge! This month, we're thinking HALLOWEEN all the way, and I must say I'm impressed with myself as this is really out of my comfort zone, once again :)


In October, we challenge you to be creative around the image below. I cannot wait to see everything you guys create! Please make sure you post it on our Facebook group so we can admire it!


Merci du coup d'oeil! Thanks for stopping by :)